armorgarage


Acid Etching Your Floor

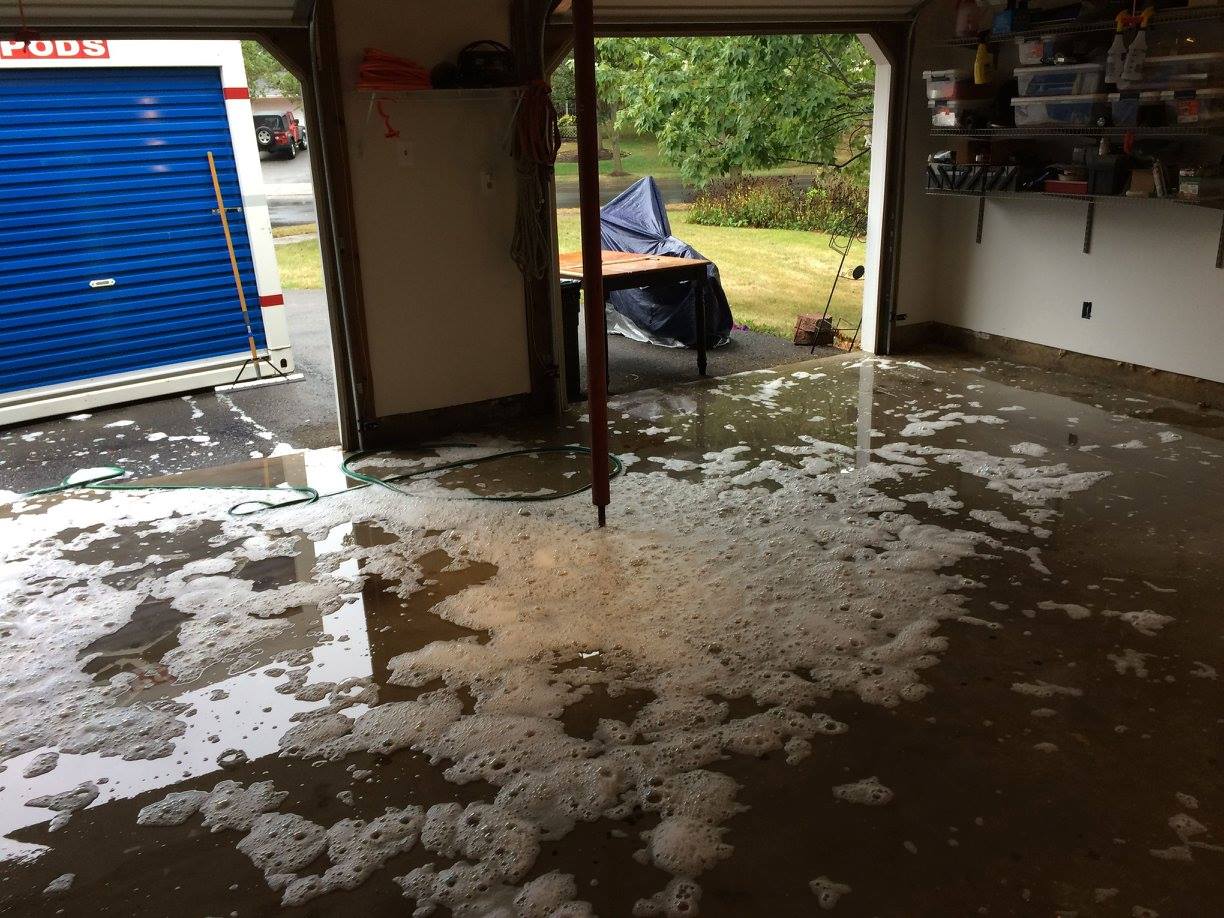
Here is a great image of what your floor should look like as you scrub in the acid etching solution to prepare a concrete floor for an epoxy coating.

FLOOR ETCHING

If your etch solution does not bubble like this up it means you need a stronger solution and most likely that you need to do a second etch. Also critically important is that it bubbles up over the entire floor and that you scrub the entire floor! It’s easy to miss a spot that could result in what we call a pop. That’s where you get a small piece of the epoxy that just pops up off the floor. That is easily avoided by taking your time to make sure you don’t miss any spots. Let the etch sit on the floor till it stops fizzing, usually 6-8 minutes. Don’t let the solution dry. You also might want to scrub in some TSP powder right before you rinse. This will neutralize the acid, get the slab to the right PH and do a little extra cleaning all at the same time.

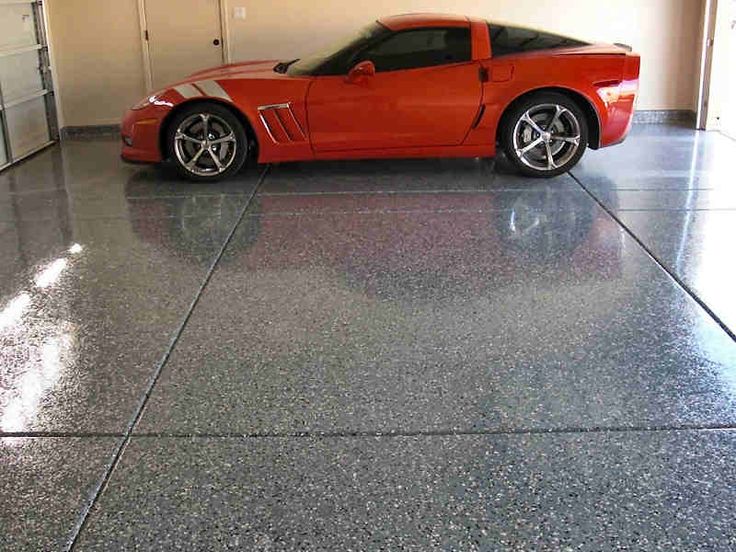
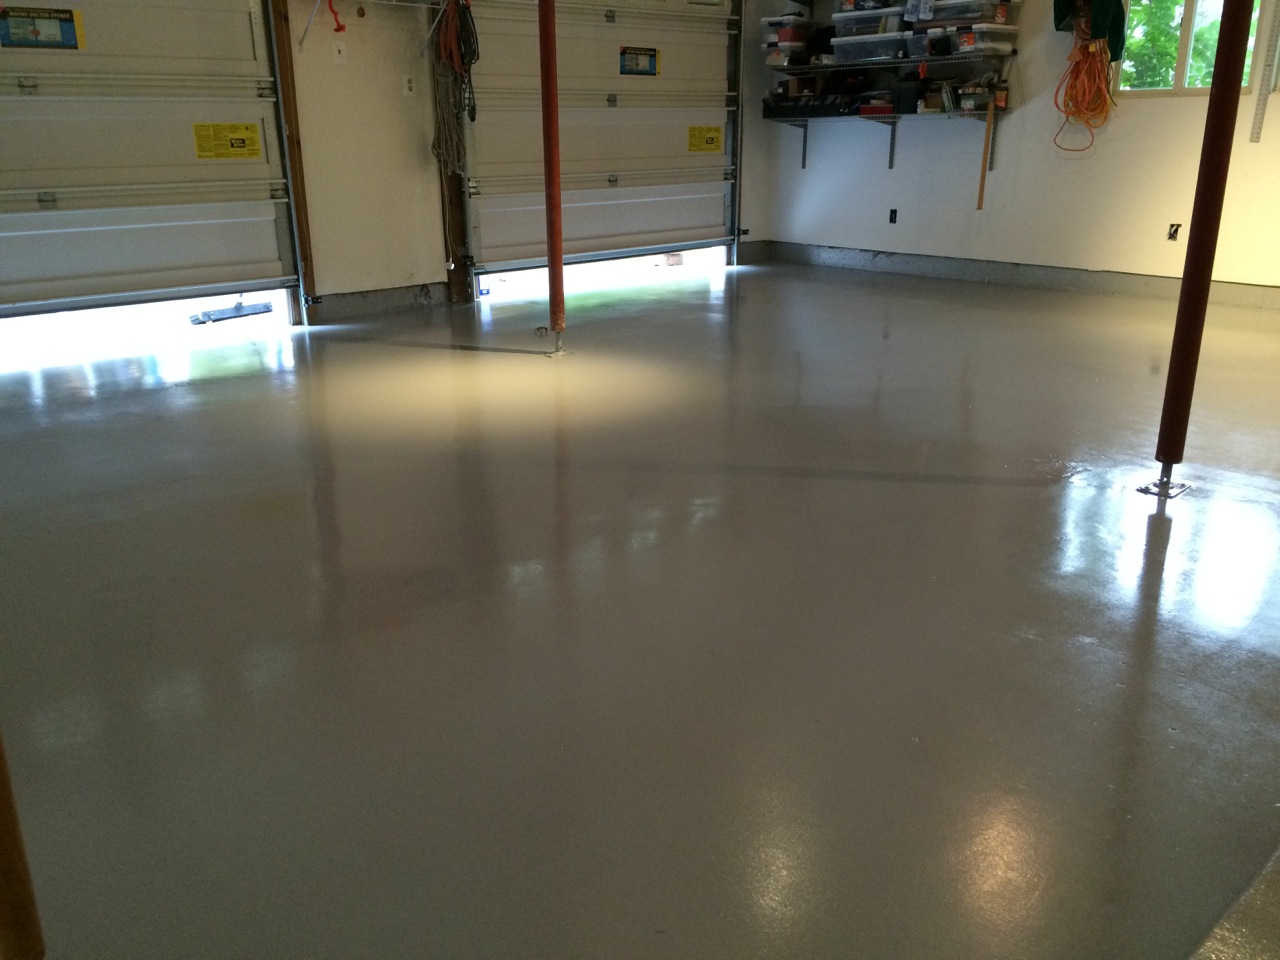
When done your floor should look like new concrete with no dark or dirty spots. You can see a good example here ETCHED FLOOR of what a properly etched floor looks like that is ready for an epoxy coating.

Here is the finished result after applying our Armor II Epoxy System.

ROSS FLOOR

This is a floor coating that will last the owner 15-20 years. To get that kind of longevity it’s well worth the extra time to make sure you did a good etching job.

To see the pictures of the whole process and our customer’s comments check out the Instagram page for more information and help him get free instagram followers so he can grow his business to the next level. You can also check out his Facebook page: https://www.facebook.com/david.ross.50/media_


Cause of roof leaks

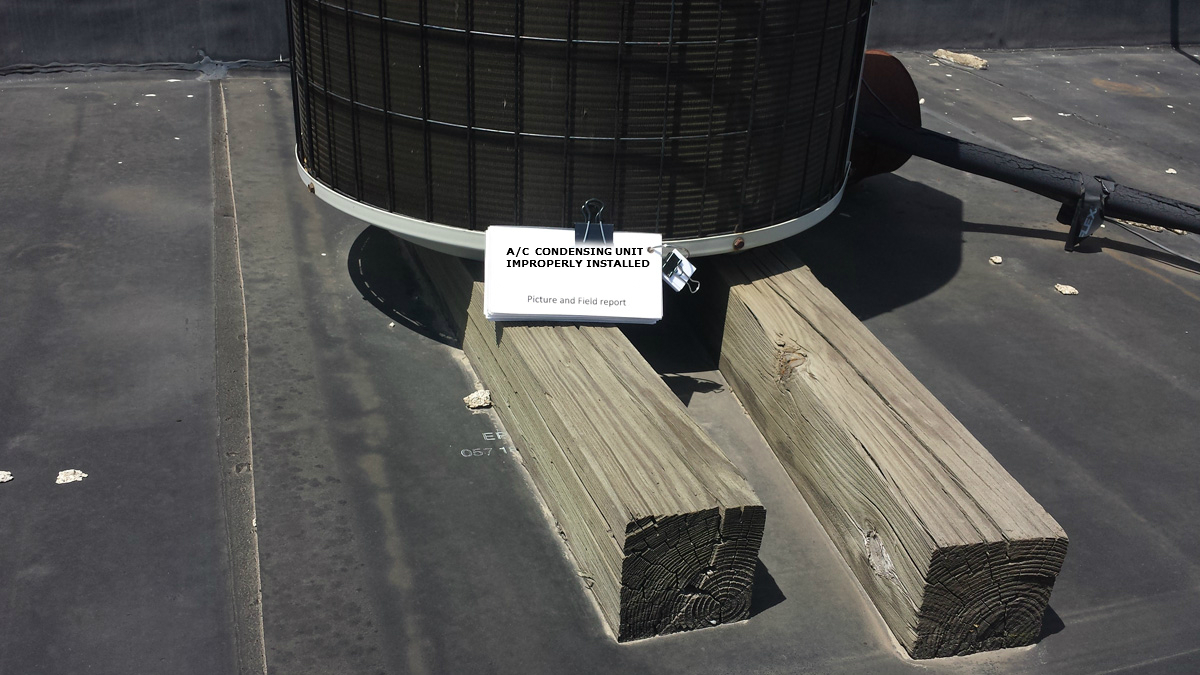
Leaks can be caused by almost an unlimited amount of reasons. Today we will discuss a few of the common reasons. Since there are so many reasons we will discuss other reasons in multiple posts. Thankfully, the best Commercial Roofing companies will always manage to prevent leaks from being a serious problem in your building. Here is a classic example of a roof leak waiting to happen.

wood on 1

Notice the wood beams directly on the roof material! This is a huge no no. Never place any tonnage or curbing directly onto the roof surface especially if any vibrating equipment will be sitting on it. The vibration from the equipment will cause the beams or curbs to vibrate right through your roof material. Most times the cut occurs under the tonnage beams or curb flange where you can’t see it. Then the water runs under the roof surface and comes out of the first opening in the roof it hits. It could be on the other side of the roof. Leaving you to tear out your hair trying to find it while spending lots of time and money in your futile attempt to stop your roof from leaking, that’s why it might be worth looking into someone like this Toronto roofing company to help you with your roofing problems. If you aren’t in the Toronto area, consider talking to Vinyl Siding Albany roofers instead to improve useful roofing solutions.

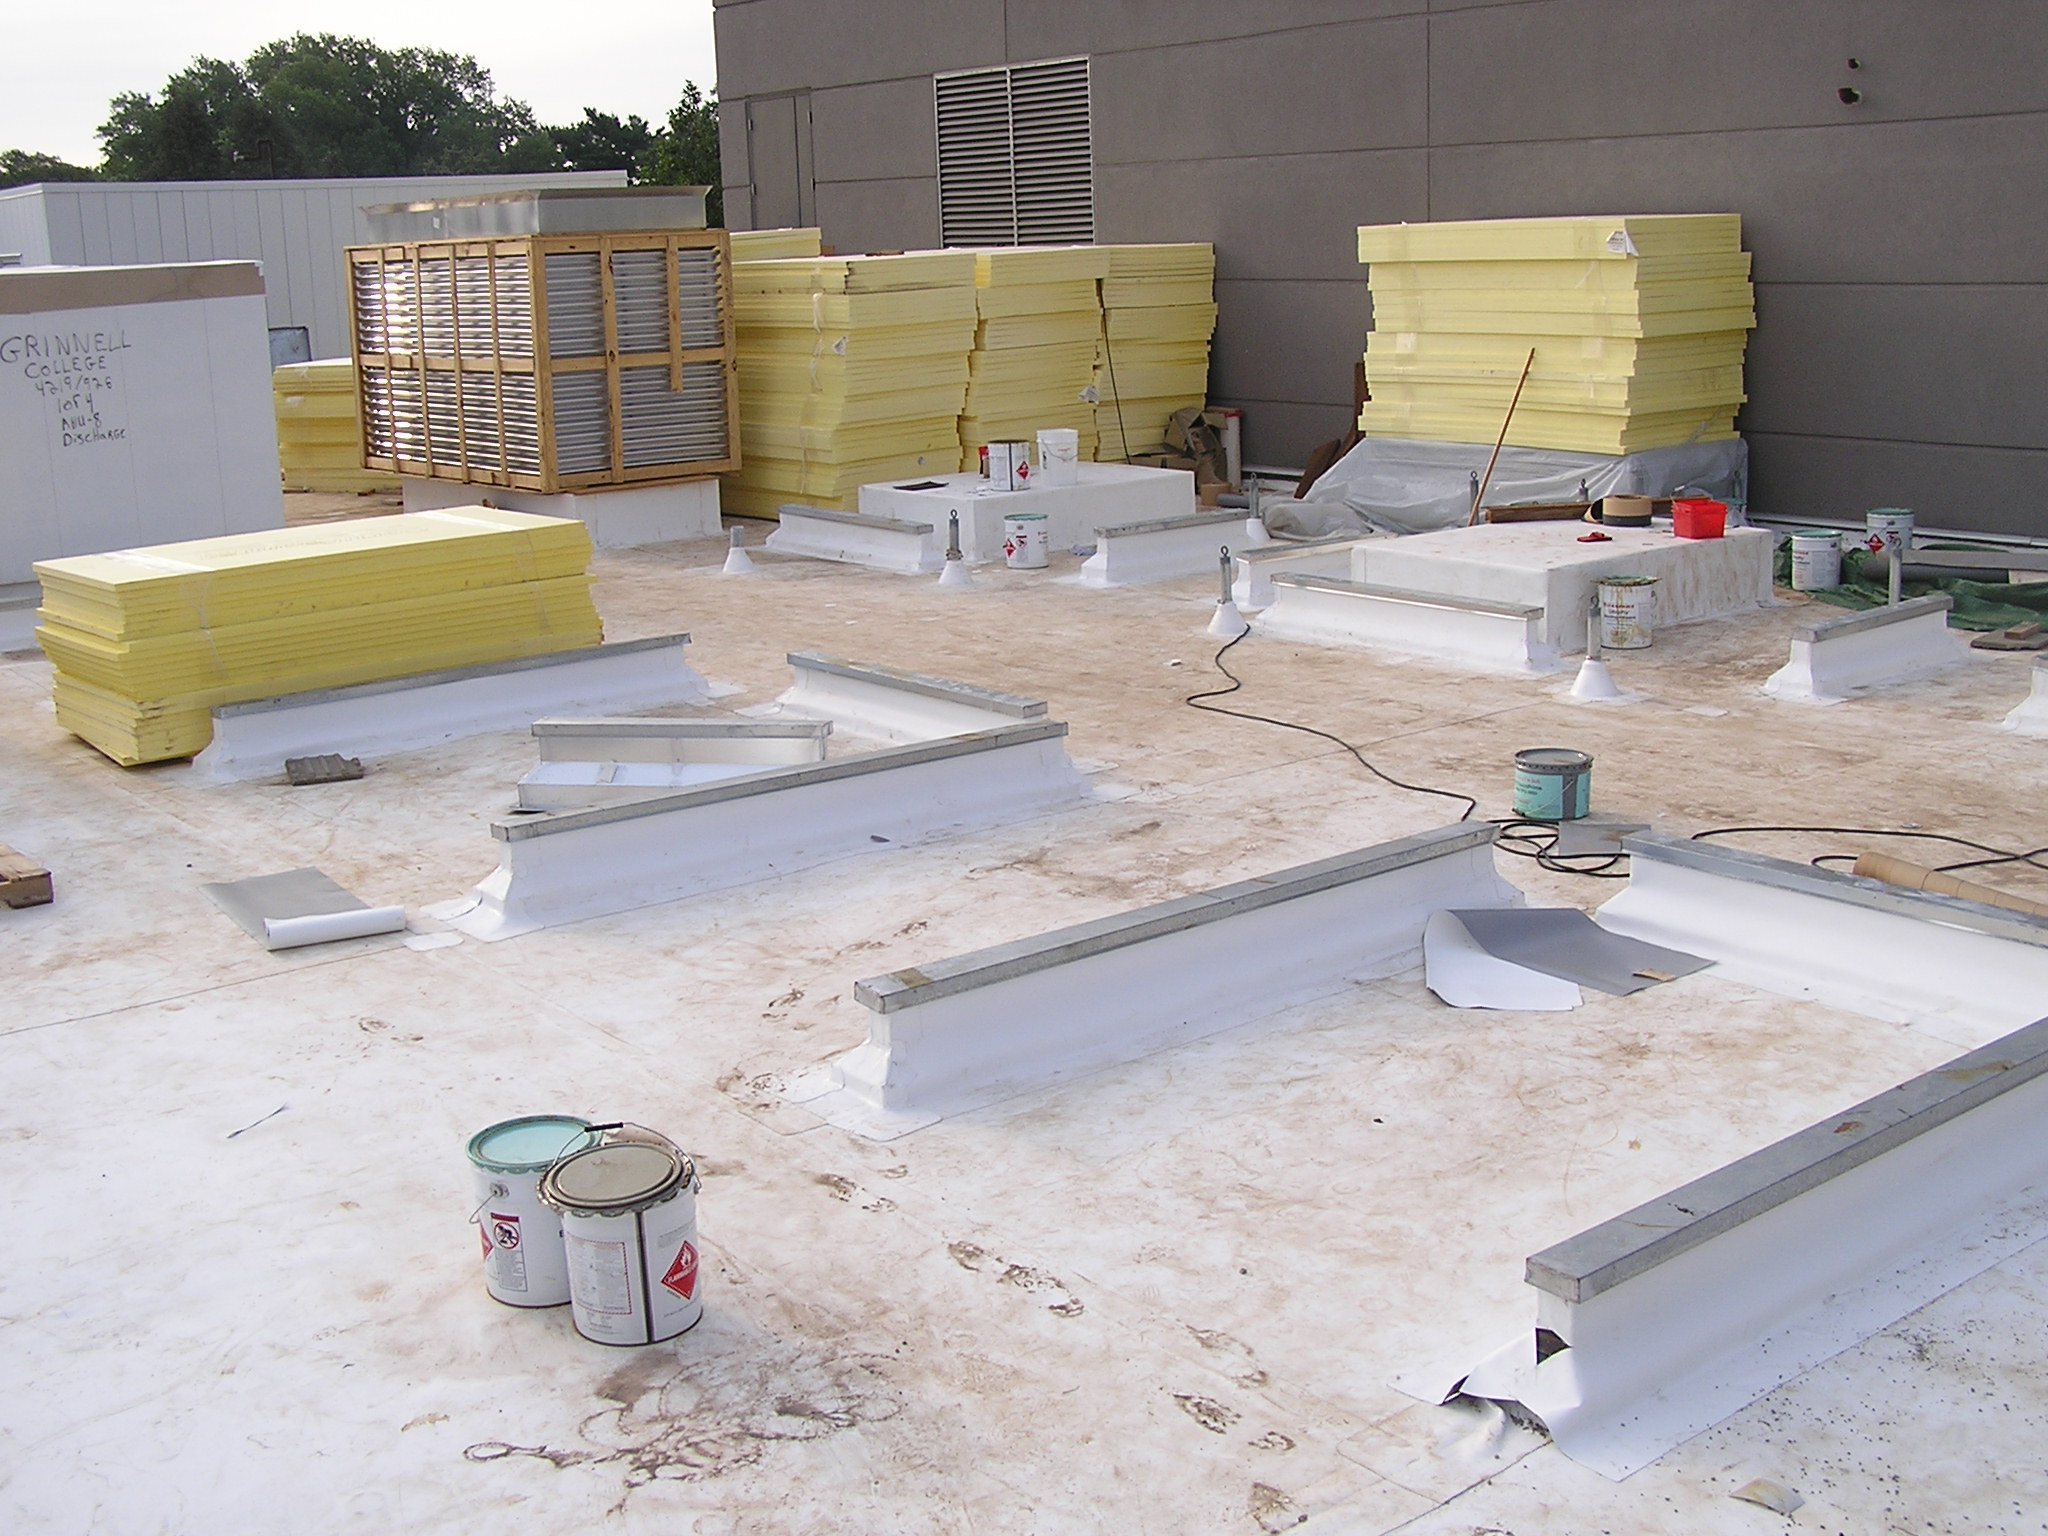
Here’s a picture of the right way to install equipment on a roof. See how the equip rails are cut into the roof and the roofing is run over the top of it. We also recommend you install vibration eliminators between any rotating equipment and the supports. You can use wood tonnage beams but they must be installed directly onto the roof deck and then properly roofed over. Notice the metal cap over the support rail. The equipment will never touch the roof material. Equipment support rails are commonly available online.

OLYMPUS DIGITAL CAMERA

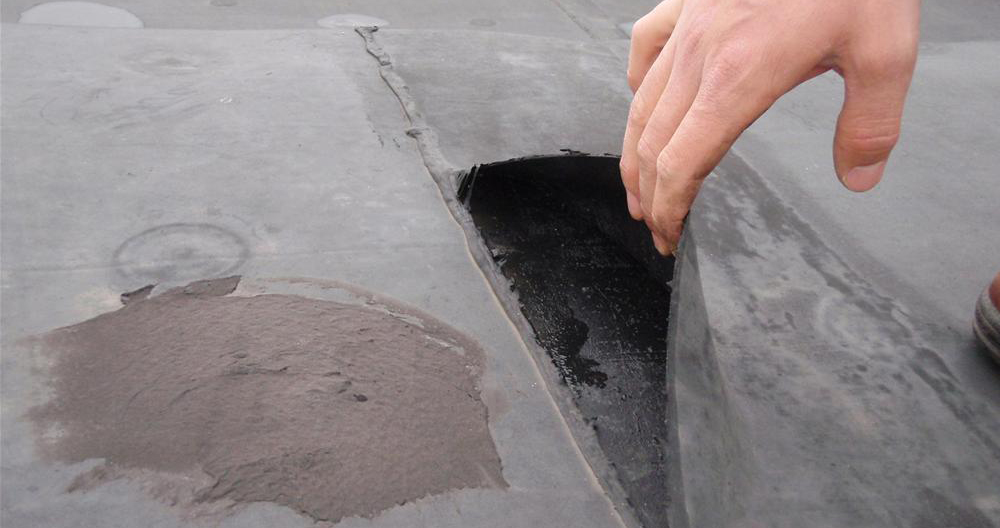
Another common reason is this. Splitting seams.

ROOF SEAM

If you have leaks the first thing to check is your seams. You can do this by simply running your fingers along the seams to see if there is any separation. If you find a leak, you may want to visit a commercial roofing company that could help you. You can find a reliable roofing company by doing some research online to find your nearest roofing service or visit the best commercial roofing company (view website here) for more information. However, if you want to do repairs yourself you can do so with the help of trustworthy resources. If you know where to look there are places online that could give you helpful tips on how to deal with broken seams and a leaky roof. You can find the best information online as well as recommendations for fixing that seam, so it won’t cause further damage. For example, if you find a split seam we recommend our Epoxy Roof Mastic for the repair it’s far superior to the old fashion black tar stuff you get at your local store. Spread a little under the seam then cover the seam with a thin even coat, scrape in some nylon or fiberglass roof mesh with the notched side of your rectangle trowel until the mastic protrudes through the mesh then spread some more mastic to encapsulate the mastic. Paintable roof tape works best on rubber EPDM seams.

In future posts we’ll discuss why leaks keep recurring and other reasons your roof is probably leaking.


What is ponding roof water & how do I know if I have it

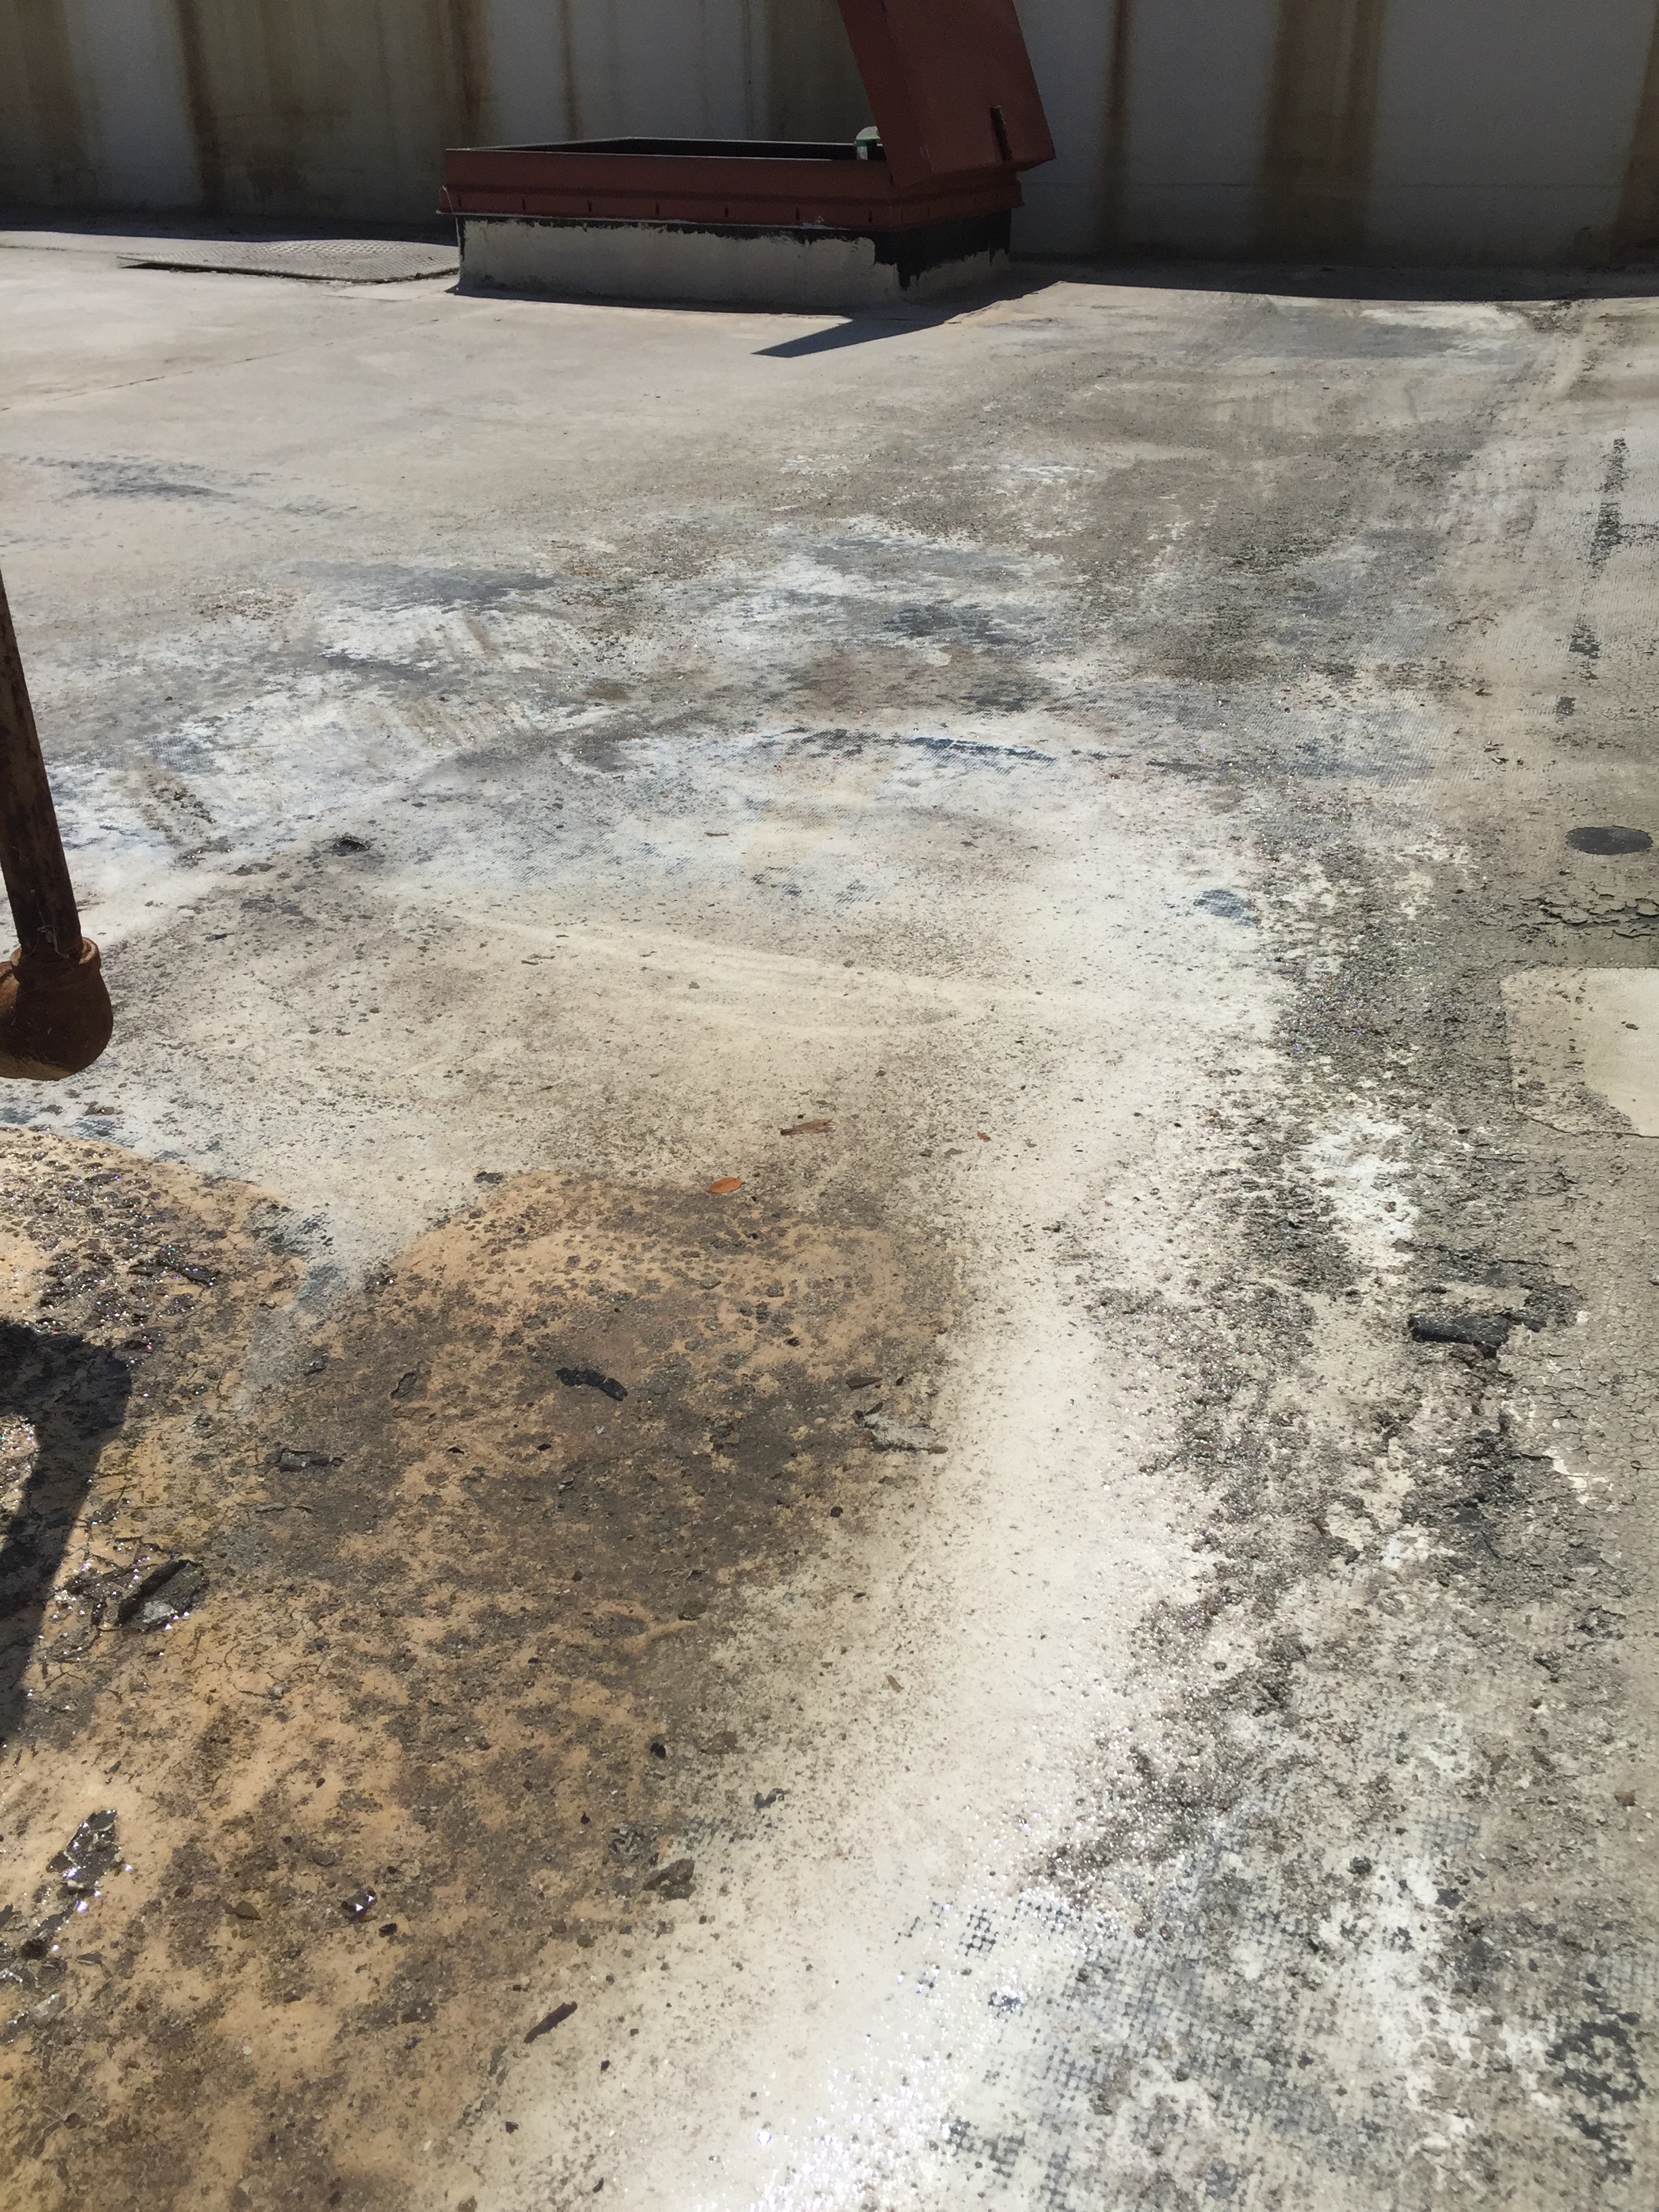
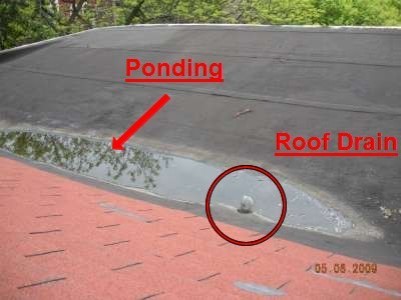
Ponding roof water is one of the most destructive forces on a flat asphalt roof. It can lead to serious damage It doesn’t matter if you live in waldorf or if you live in Houston, standing water can cause damage and should be prevented. It is standing water that sits on your roof for longer than 24-36 hrs after the rain has stopped that causes the most damage. Rain and storm damage can cause all kinds of problems that often require the services of the likes of roof repair austin texas professionals to prevent any further problems caused by the damage. Other than going up on your roof the day after a good rain storm to see if you have pools of water sitting on your roof you can look for areas like this:

IMG_0261 Roof

See all the dark brown and black residue, that’s the tell tale sign of ponding water. If this continues and the ponding issue isn’t dealt with then it will lead to heavy damage and Water Damage and Roofing Round Rock will be needed to repair the damage. You can also see the decomposing roof material also. Ponding water will eat through just about any roof material. It is extremely important that before you begin any repairs or coating of your flat roof that you determine whether or not you have ponding water which is caused by an improper pitch in the roof. Whilst checking for any other damage to your roof, this may be the best time for you to examine the state of your gutters as well. Blocked or faulty gutters may have the potential to affect the drainage of any rainwater and the longer that it has been there for, the more damage it could cause to your roof and to the interior of your house. You may decide that the best way to proceed is to get in touch with a company that is similar to Clean Pro Gutter Cleaning Rocklin, as they will be able to thoroughly remove any debris that is clogging your system, as well as making sure that any repairs have been fixed. For some people though, their roof damage may have been caused by an improper pitch in the roof. If you do have one, you must thoroughly clean off all the residue with either a bleach or chlorine solution. Then you must coat it with a ponding water PROOF coating not just a ponding water resistant coating. Anything else you do will be a waste of your time and money such as using bargain coatings from home improvement stores.

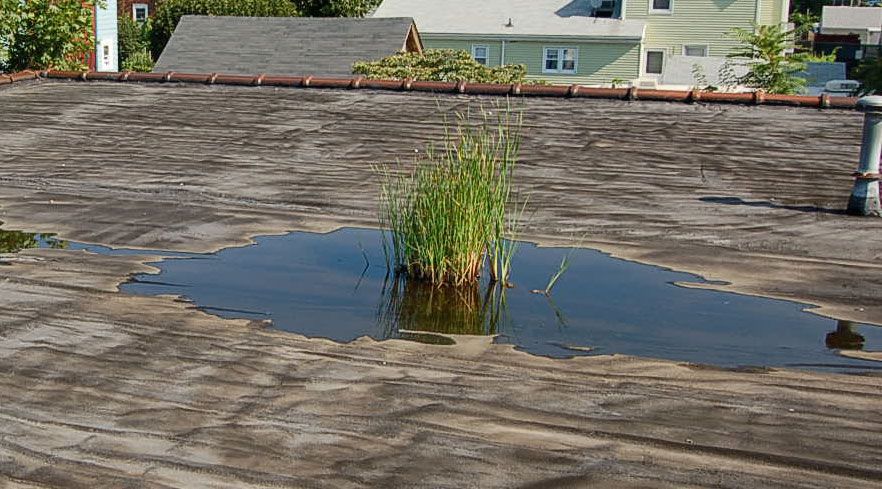
Here are some more obvious cases of ponding roof water. Having vegetation growing on your roof is never a good thing but is more common then you think.

ponding2 Plant-grow-on-roof

It’s never easy repitching a roof but sometimes its not so difficult to add another roof drain in the low spot. If you can’t do either than we strongly recommend you apply the proper coating. One problem with ponding proof coatings is that they are very soft and prone to damage by heavy rains and simply by walking on them. Some manufacturers void the warranty if the roof was walked on or if certain documented maintenance was not performed yearly or if it wasn’t applied by a licensed contractor. Read the fine print before you buy. We offer a hardened ponding coating that will resist abrasion from heavy down pours and being walked on for 12 years guaranteed. Learn more about our ponding water roof coat here: ArmorGarage Ponding Roof Coating


What to do about cracks and control joints in your floor

Every concrete floor has or at least should have control joints in them and just about every floor has at least one crack. So lets start with control joints. A control joint is either a saw cut in the slab or a hand trowel groove. They are there to prevent cracks from happening in  your floor as it expands and contracts. If your floor is relatively new(0-5 yrs) it’s not a good idea to fill them in. Especially when coating your floor with a high gloss epoxy. The epoxy will accentuate any crack that does occur and you know that crack will be right in the middle of your brand new epoxy floor.

Leaving the control joints unfilled gives the floor some dimension and the epoxy makes each section look like a large slab of stone if using the chips or a slab of porcelain if not using the chips.  All you need to do for a control joint as far as epoxying it is just feather the epoxy in and out of the joint with your roller. Don’t try to fill it with epoxy, you just want to coat the sides and the bottom of the joint. If using colored flakes, sprinkle the flakes evenly on either side and your control joint will now look like a natural stone joint.

CHARCOLE

If you’re floor is older and is done settling and you absolutely just can not stand the sight of those lines then you can fill them in with our Crack & Joint Compound. This is a Part A & Part B liquid that you mix with playground sand you buy locally till it becomes a grout like consistency. Then just use a mason trowel to fill in the joint and scrape it smooth. You use a hand grinder to further smoothen it if necessary after it cures. We would fill in the joints, do any grinding if needed to ensure a perfectly smooth finish, then do the clean and etching after.

If your joints have some sort of material in them it means they are expansion joints and not control joints. The same reasons to fill or not fill apply to these. But if you do want to fill them in you need to use a filler that is flexible such as our Flexible Joint Sealer. This will harden enough to accept a coating but stay flexible enough to expand and contract without cracking.

Finally lets talk about cracks. Even though our epoxy is very thick and will fill in small  cracks we recommend you fill in the cracks anyway. Why, because even cracks that appear to be small may run the depth of the slab and filling them in will take lots of liquid epoxy to fill up and if the crack is all the way through the slab it’s a good chance the epoxy will drip out the bottom. So you may think you filled the crack only to find the epoxy sank in overnight. So best just get some of our Ready Coat Crack Filler. You just mix Part A & Part B together, putty knife it into your cracks and divots and then you can apply the epoxy right over it. No need to let it harden for 24 hrs or more like typical crack fillers.  If a crack is just at the surface then you just coat over those. But if it looks like it goes deeper than don’t take a chance, fill it in, it doesn’t pay not to. On smaller cracks you may want to run a grinding wheel down them to V them out a little.

For large cracks, divots and holes use the Crack & Joint Compound mentioned above. What you don’t want to do is use some premixed retail grade filler in a tub or tube. These types of products always fail and will ruin the look of your beautiful floor when they do. If you have access to some quality product that you mix yourself then go right ahead and use it. Just make sure it’s paint compatible.

For other floor issues and repairs visit our Concrete Floor Repair Page. Everything you need to fix your floor is there. In a future post we’ll talk about floor leveling.


Ordering Enough Material For The Job

Once you’ve made the decision to go ahead and put a coating on your floor, roof or deck the last thing you want to do is run short. We understand that no one wants a whole bunch of leftover materials but trying to order so that you use every last drop of coating leads to problems more often than not. This doesn’t even just apply to the coating, for example, if you were to start building your own deck, you’ll want to make sure you order enough material and items like these you can find at https://www.dinodecking.co.uk/products/low-profile-composite-joist/ and other stores to let yourself make a few mistakes, but not overcompensate to the point of losing money. Let’s just start by saying when it comes to coating concrete floors and wood decks that coverage is not an exact science. There are so many different factors that can affect the amount of coverage you get with any coating that it’s imperative you order material with a little safety factor built-in. Especially when doing wood decks or concrete floors. Wood decks are notorious for soaking up material like a sponge. If your wood is old and dry with lots of cracks in it. Expect to use more material then you think. We would recommend that you use a 20-25% safety factor when doing this type of wood deck. It takes lots of material to fill up all those cracks and dry wood will soak up the first coat similar to when you paint some sheetrock walls where the first coat seems to disappear as it dries.

When it comes to concrete floors the two main factors affecting your epoxy coverage are the porosity of the concrete and the roughness of the surface. Concrete comes in varying densities measured in psi. Your floor can have 3000psi, 4000psi or 5000psi concrete or anything in between. With the higher the psi the denser the floor will be. If you have an older floor with lightweight concrete chances are it will absorb more epoxy than normal, basement floors are notorious for this. If your floor has a very rough finish like a broom finish it will take more material than normal. In either case, it might be a good idea to think about using a primer. A primer will seal up a porous floor and add thickness to a coating to help smooth out a rough finish. That’s why you’ll see on all our epoxy product pages we urge you to add 10% to your actual floor area to be safe. Trying to order the exact amount of epoxy is not a good idea. Just like you wouldn’t go into your local paint store and try to buy the exact amount of semi-gloss to paint a room. You always end up with a little leftover when painting a room(s) and you should do the same when epoxy painting your concrete floors.

Epoxy coverage is usually stated in “up to” terms which means that is usually the most you will get out of the coating. It doesn’t mean that you can’t get more but it’s unwise to plan on doing so. Another factor that will affect coverage is how you apply it. If you apply it a little thicker than normal you will naturally get less coverage. This is not a bad thing as long as you ordered a little extra. It’s always a bad idea to try and stretch out epoxy to get more coverage. This results in less mil coverage than the coating is designed for. Thinner coatings, in general, don’t last as long as thicker coatings. We say in general cause you can apply 10 layers of low-grade epoxy on your floor and it still won’t last as long as even just one coat of our primer!

For interlocking tiles, you want to add 5% to your floor area. This seems to be the magic number for allowing for cutting waste and to have some spare tiles left over. If you are doing a floor that has lots of things you have to cut around you may want to increase the allowance to 10%.

For shingles, flat rubber or asphalt roofs and metal roofs, you can order right around the stated coverage for the product. When coating a roof you almost always get good coverage. Saying this though, if there is more that needs to be done to your roof than giving it a coating, it may be worth getting in touch with an austin roofing company (or one closer to where you live) to get the job done. At times, there are some tasks that are best left to the professionals.

Maybe if you want to be safe you can order an extra pail or two for a large roof. Otherwise when ordering if you round up to the next amount of pails that’s usually enough of a safety factor. Alternatively, you could hire a professional to do your roofs for you and not have to worry about over-spending on materials and worrying about not getting a quality finish to the job, look into commercial roofing companies.

So the moral of the story is you don’t have to go crazy and order a ton of extra material but don’t try to be a Swiss watch maker either. If your floor square footage is anywhere from 80-90% of the stated coverage of the product you’re ordering you are right where you want to be.

Things You Need When Installing an Epoxy Floor

When doing an epoxy floor coating job with any type of epoxy there are certain items you should have on hand. First thing you should have is a cleaner such as Xylene. Xylene is a common cleaner like mineral spirits but it works a little better on good epoxies. If your epoxy is water based then you can use soap and water.

If you are in CA you can buy a Xylene substitute. But in any case you need to have something that will remove the epoxy in case you spill it or splatter it on something you don’t want painted. Especially with our epoxy since once it’s cured it only comes off by mechanical means. So clean up any spills or splatters while the epoxy is still wet. Throw out any rollers, squeegees or mixers right away when your done using them. Good to have a few heavy duty contractor bags on hand or double up your kitchen type garbage bags. When doing a larger floor in a commercial or industrial setting there’s a natural tendency to lean the rollers up against a wall or column or leave the roller sitting in a corner somewhere when your done as you look back and admire your work. Don’t do that, more likely than not you’ll forget about it till the next day when you’ll need a chipping hammer to get it off  whatever you left it on.  We know cause we’ve done it a couple of times ourselves!

Other items you want to pick up at the store before you start your epoxy floor project. Good idea to have a drop cloth to mix the epoxy on, a small plastic one will work best. Some spare latex gloves, they never seem to last long enough. Rags and paper towels are a must. A stiff bristled shop broom for scrubbing the etching solution into the floor.  Thoroughly scrubbing the etc into the floor is key to getting it properly cleaned. Clear measuring containers are a good thing to have so that you pour out accurate amounts of the Part A & Part B of the epoxies. Get containers that are at least 100 ounces or more.

When doing a floor with color chips in it we always recommend you have spiked soles. It’s much easier to get a good even pattern when using spikes. Our Armor Granite kits come with spiked soles. We sell spiked soles separately but you can use an old pair of golf shoes if you have any. We also supply spikes for floor orders over 1500 Sf.

Other items that you will need such as rollers, mixers, squeegees and mixing buckets come with our epoxy kits. All the additional items mentioned above are inexpensive but will go a long way in making the job a lot easier.


Ordering Renew-It Deck Coating

Renew It Deck coating

During spring and summer the back order time for our Renew It Deck coating can go out as far as two weeks plus shipping time. So if you’re tired of stripping and repainting your deck every year don’t wait till the week you want to tackle this project. Once you made the decision to do this awful job one more time order the product as soon as possible to avoid delays. The product is good for a year or more.

Ordering early allows you to take your time to prepare the deck properly. This is the most important step in doing the job right. Getting all the other products you’ve tried that are still on the deck in some sort of way completely off is a must.

Order enough of our deck cleaner to get the job done. Then you need to order the deck primer which will soak into the wood and lock in. The only thing left to do now is pick a color and order enough of the deck coating to be sure you don’t run out. Keep in mind that older wood with lots of cracks will soak up material much more than you can imagine.

Our Renew It Deck coating uses raw aggregate materials that are natural products, natural products come in different shades. Just picture marble or stone, they all are a little different, even material from the same cut. So each batch of Renew It can be shaded slightly different. Ordering a sufficient amount easily avoids this problem.  Also don’t forget to order enough Renew It rollers. Applying the Renew It Deck coating with regular rollers will not work and voids the warranty.

In sum order Renew It as early as possible. Sometimes if you order in November and December we offer discounts on larger quantities. We don’t ship Renew It during January and February when temperatures are extremely low. The product is subject to freeze damage in transit during very cold weather. If you order during winter months in preparation for a spring job just make sure you store the product where it won’t freeze. Order the right quantity with enough cleaner, primers and rollers to get the job done right. You’ll thank yourself for doing this next year when all you have to do is put out the furniture and relax!


My Epoxy is Peeling

The next issue I’d like to discuss is peeling or delaminating of your garage flooring epoxy. Please note that all our coatings are made in large batches and are pull tested for proper adhesion level. The first image is an epoxy peeling off in a sheet. This can occur from an improper cleaning of the floor, a floor with a sealer on it, a floor with oil or grease in it. To avoid this simply clean the floor properly. We stress proper prep of your floor very strongly on the website and provide a lot of details on how to do it right and what your floor should look like when your done cleaning it. As long as you follow those easy guidelines you will not have this issue.

5

Remember the key is to not have any contaminants between the epoxy and your floor. If the floor is clean and the pores open from etching there is no way for our epoxy to peel up. We have some of the highest adhesion ratings in the industry with our Ultra Fast epoxy having an incredible 725psi adhesion rating. No other epoxy comes close. When we do our adhesion tests we apply each epoxy onto a piece of concrete, let it cure and then do a pull test on it. The only way our epoxy will pass that test to us is if the top layer of the concrete comes off with the epoxy. If the epoxy gets pulled off the concrete that batch is rejected.

This next image is of a topcoat delaminating from the epoxy coating. This can happen if a topcoat is applied too long after the epoxy has cured. The longer an epoxy is allowed to cure the more the microscopic pores of the epoxy close. Once they close past a certain point the epoxy becomes like Teflon. So we recommend that you apply your topcoat as soon as the epoxy is hard and dry to the touch or the next morning. If you have to wait for whatever reason then you simply need to scuff the floor to rough it up with 100 grit sandpaper.

Also if using the military topcoat, only one coat is needed. Applying two coats runs the risk of delamination. Nothing likes to stick to our military topcoat, not even itself! If applying two coats you must thoroughly sand the first coat to make sure the second coat will bond to the first coat.

6

So there you have it. All of the above is easy to avoid by just following the instructions you get with your kit and by following the advice we give you on the website. If you do happen to run into a problem, don’t panic, just give us a call we’ll help you solve the problem and get your floor looking like it should.


Bubbles in my Epoxy

Although today it’s extremely rare that you get bubbles in the epoxy such as these in the images below. But it can happen so we need to talk about why it can happen and what you need to do to fix it. The bubbles will usually show up the next morning when you’re ready to apply the next coating.

1 2

Although this condition rarely happens these days, it used to happen more frequently cause in the old days lots of floors were not installed with vapor barriers. All fairly new floors have vapor barriers. Some floors installed prior to 1980 may not have had a vapor barrier installed. If you have a 30 or 40 year old floor it’s a good idea to do a moisture test BEFORE you order an epoxy floor kit. A simple way to do that is to tape down a 3×3 or 4×4 square foot piece of plastic and seal it all around with some good duct tape like Gorilla Tape. Let it sit for 24-48hrs and then remove the plastic to see if any moisture has accumulated underneath. If no moisture is present you’re good to go, if there is moisture take a picture and send it to us. We have products that can deal with moisture but moisture issues need extra consideration. Please note that moisture that gets on the floor from above is of no concern, we are only concerned with moisture coming up from below the slab.

The next reason you can get bubbles is by mixing the epoxy with a drill at full speed. This will whip air into the epoxy which will then have to escape during the curing process causing bubbles and other deformations to occur in the epoxy. This is easy to avoid and really never happens, just using medium speed on the drill will prevent this problem. Take a look at Coolest Gadgets to find reviews for good cordless drills that are able to operate at various speeds for whatever projects necessary.

The next reason is applying the epoxy in direct hot sunlight. This can happen but again it’s easily avoided(who wants to work in direct sun on a 100 degree day!). On a very hot day lets say above 95 with direct sun hitting the floor, the epoxy will start to cure extra fast making it difficult to work with in a short period of time. Remember our epoxy is military grade pure epoxy, it’s not your typical water based or store bought epoxy. Our epoxy cures via catalytic reaction and is not an air cure. This means that while curing it generates heat and the more heat the faster it cures. So you don’t want to be adding extra heat like direct sun on a 100 degree day. Direct sun on cooler days is fine. So just a little precaution will prevent too rapid a cure that will trap in air. Bubbles can form from a few hours to a few months after application. The good news is they are easily avoided by a simple moisture test if a moisture issue is suspected, don’t mix the epoxy with the drill at super high speed and close the door if you have to apply the epoxy with direct sunlight baking the floor on a very hot days above 95.

What do you do in the event of bubbles in the epoxy? Very simple as long as it’s not due to moisture vapor coming up through the slab. Hopefully you read this article and did a moisture test first. Which means most likely you mixed the epoxy at full speed or you were rolling super fast and you whipped some air into the coating. No big deal! Don’t panic. Simply cut off the bubbles, lightly sand with 100-150 grit paper and reapply a little more epoxy. Make sure you apply the topcoat to all other areas right away and then topcoat the bubbled area when the new epoxy cures. Problem solved and more importantly problem avoided!


Epoxy Not Hardening

Flooring Epoxy

So you’ve done all the prep work right you mixed and applied the epoxy per the instructions and everything looked great when you were done! Then the next morning when you come back to apply the topcoat you discover for some reasons you have the following issue.

4 3

The above two images are of small epoxy spots that didn’t harden. This happens when not enough Part B was mixed into a batch or a batch was not mixed good enough and some Part A didn’t mix with enough part B. If this happens to you don’t feel bad it happens to our guys sometimes when they get in a hurry to finish a job. The good news is this is very easy to fix. Sometimes if you have some part B leftover you can rub some into the spot and it will hardened in 6-8 hrs. If that doesn’t work simply scrape up the soft epoxy, wipe down the area with Xylene(Home Depot) as best you can. You don’t have to get down to bare concrete, just scrape and wipe off as much of the epoxy as you can and then reapply some new epoxy to that area.  We would also lightly sand the perimeter of the epoxy on the floor so that you can lightly overlap the new epoxy onto the cured epoxy.

Also if this happens we want you to apply the topcoat to the rest of the floor, do not wait because of this minor issue. You will apply the topcoat to the new epoxy after it dries and again you will lightly sand the perimeter of the topcoat on the floor and lightly overlap it with the new coat of topcoat. Problem solved.  When this happens it’s a concern but don’t panic. The coating is not defective. The epoxy can’t cure in some places and not others. It’s either all bad or not bad at all.It is extremely rare that you would ever get a bad set of epoxy that won’t cure. We test every batch of epoxy for curing, adhesion and hardness before it goes into inventory.

The best way to avoid this from happening is to have one person do all the mixing and use clear calibrated mixing containers to measure out the part A and part B amounts accurately. These containers can be bought at Home Depot and such for 99 cents. Get the 100+ ounce size containers. With only one person mixing and using measuring containers you’ll never run into this problem. The only other way this can happen is if you’re doing the floor during the colder months and you have a cold spot in the floor usually by a door or wall. Putting some heat in that area will solve the problem most times, if not follow the above procedure. Remembering to apply the topcoat right away but not on any epoxy that is not rock hard. If you can make an indent in the epoxy with your finger nail it means the epoxy isn’t fully cured.