Info-Blog


WHAT IS THE MOST IMPORTANTTHING WHEN BUYING EPOXY FLOORING?

The answer is how well will the coating resist wear and tear, Abrasion is the biggest enemy of any epoxy floor coating. If your coating doesn’t have the proper thickness and a true high performance urethane topcoat your floor is going to look great the first day you put it down. But then 90% of the time its downhill from there. The destructive forces of your vehicle’s tires, road salts and chemicals will see to that and once they penetrate the surface of your coating ever so slightly it begins an irreversible process of dirt spots, dull spots, staining, moisture and or chemical degradation. The key is to have an impenetrable layer over your actual epoxy. Some companies just use the same epoxy in a clear version, that’s not a topcoat. Your topcoat has to be much harder than your epoxy otherwise it’s a waste of money.

ArmorGarage has the best topcoats in the business, it’s why our floors look so great even after 15-20 years! That’s not just us saying that either. Take a look at the video at the top of the Home Page, it’s an Armor Chip floor with our military grade topcoat done almost 16 years ago and it still looks new even with big SUVs,and several cars turning in and out of their parking spaces several times a day! It’s still glossy enough where it still reflects light! This is not what you’re going to get with off the shelf garage epoxy floor coatings.

Now take a look at this CASE STUDY towards the bottom of the page. It’s a floor done with Armor Chip, primer and the military grade topcoat. When you first look at the pictures you’re going to say to yourself that floor looks like bloody hell and say what are the ArmorGarage guys thinking of showing this floor off. Well when you hear the facts about the floor you’ll realize why we’re showing it off. The floor is in a large Liquor warehouse store in NJ that has an average of 3000 customers per day walking through the store. There is also all sorts of other mean nasty and abusive things being done to the floor 7 days a week 365 days a year. There’s forklifts, pallet jacks, hand trucks running around all day, there’s employees dragging pallets across the floor by hand all day and shopping carts rolling around nonstop. On top of all that the floor has gotten zero maintenance, no washings or cleaning at all. The only time it’s cleaned is if a customer drops a bottle of alcohol on it and it’s wiped up by an employee. That’s the extent of maintenance performed. So when you take all that into account it’s easy to see why the floor looks like it does but in reality it’s in great shape after 14 years of abuse and neglect. So how does this apply to you? Just think about your application, you have a car, a pickup or SUV that you basically pull straight in and out everyday. That’s child’s play for this floor and why your floor will still look great at it’s 20th anniversary.

So at the end of the day you might be told that’s what you’re getting and what you think you’re getting with another product you’re considering to purchase but it’s just not going to happen. The video and this case study is all you need to know to purchase your epoxy floor coating with peace of mind!

ALL 100% SOLIDS EPOXIES ARE NOT CREATED EQUAL

As with most products in life there are similarities and also big differences in products that sound and look the same. Today there are lots of epoxy floor coatings proclaiming to be heavy duty, 100% solids or that high solids are good enough(no they’re not!). So what’s the difference and how can you tell which is the best product?? First be careful who you buy from. There’s a lot that can throw you off such as some companies advertise their epoxies as 100% solids when in fact they’re only 100% solids by weight and not volume which means they’re not truly 100% solids. See what we mean? When you purchase an ArmorGarage Epoxy System that is 100% solids it’s 100% solids by weight and volume in addition to being Military Grade 100% solids. Cyclioaliphatic epoxies tout being 100% solids but they are not military grade by any means. They’re a hybrid solids epoxy designed for cost savings. When doing an epoxy flooring project, saving a few dollars should not be your main criteria. It always costs you more money and heartache in the long run.

What are some of the other things to watch out for. Know that there is no such thing as lifetime epoxy coatings. Products advertised as such are just marketing gimmicks and you will never get lifetime warranty coverage on such epoxies. Also realize that warranties against Hot Tire Pick or peeling off is not the same as coverage from the epoxy wearing off! We offer a 5 year warranty against wear. Wear is the single most important factor you should be concerned with when buying an garage epoxy floor coating. The durability of the coating is what determines not only how long it will last but also how long it stays looking new. Most epoxy floors look great when first put down but soon start looking old and dirty when they’re not military grade. So when purchasing your garage epoxy flooring ask them what the guarantee on wear is. We get 100s of calls from customers who thought they were putting down heavy duty epoxy only to find out a lot sooner then they ever expected that the product they purchased was nowhere near heavy duty as claimed.

Beware of water based epoxies, these are all inferior and their claimed to fame is that they are environmentally friendly. That’s true but they don’t work well at all. First off they are up to 50% water so when you apply them 50% of the epoxy you bought evaporates into thin air leaving you with a paper thin coating. How can you tell if an epoxy is water based? It usually has a “WB” in the model number or part number. Also the pot life is usually in hours rather than minutes.

Water Based Epoxy Floor Coatings

Another thing to look out for is the final thickness of the finished product. ArmorGarage garage epoxies Armor Chip & Armor Granite are 20-30 mils thick versus some so called 100% solids and heavy duty epoxies that are 2-10 mils thick only. We can go on but hope you get the idea. If you haven’t done this before there’s a lot of things you don’t know about that will effect your satisfaction with the time and money you spent on doing your epoxy flooring project.


NEW PRODUCTS

NO PREP INSTANT PRIMER & VCT TILE COATING

ArmorGarage has added some amazing new products to our product lineup. 

First up is our game changing epoxy primer that requires virtually no prep and can instantly be epoxy coated over. You simply need to remove any nonbondable contaminants such as surface dirt, oil, grease or rust etc. This works over dirty concrete you just need to remove any dust with a vac or leaf blower or any dirt buildups. Then simply use our Acetone resistant hand pump sprayer or one of your own and spray down the primer. Let sit for 15 minutes till it gets tacky. Then immediately apply any ArmorGarage epoxy floor coating. This primer is super high performance and cannot be separated from concrete once it cures. Apply all the epoxy within 90 minutes. You can do the floor in sections, this gives you 90 minutes for each section to ensure you apply the epoxy within the coating window. If you miss the coating window for any reason simply scuff the primer with 120 grit and reapply some primer. This amazing primer utilizes ArmorGarage epoxy technology combined with Primera Nano Technology to allow it to stick to almost anything. Great for concrete floors with exposed aggregate(small river stones at the surface) and other hard to bond to surfaces. Thus eliminating the need for shot blasting, diamond grinding or etching. Saving time and money. This is a great solution for jobs that have limited down time. See the product here: https://www.armorgarage.com/noprinpr.html or contact us for help from one of our Reps.

Next up is our revolutionary VCT & Vinyl Floor Coating. Putting a permanent clear coat on VCT Tile and Vinyl Flooring has been the Holy Grail of the epoxy coating business. There are plenty of coatings that can be applied but none that will permanently adhere till now. We have gotten thousands of calls from customers that are looking to get out of the constant stripping and waxing of their vinyl floors. Stripping and waxing is time consuming and costly and must be done continuously or the your floor will start to look very shabby very quickly. ArmorGarage’s epoxy technology once again combined with Primera Nano Technology allows our clear liquified epoxy quartz coating to be sprayed onto any type of vinyl floor or linoleum and totally bond to it. Dries to a beautiful clear gloss finish that is extremely durable and easily cleaned. Eliminates scrubbing, stripping and waxing. This is a fantastic product for institutional and commercial applications in large high traffic areas where cleanliness is critical.

For more information see here https://www.armorgarage.com/vcttilivishc.html or talk to one of our expert Reps today.


Patching A Pitted Garage Floor

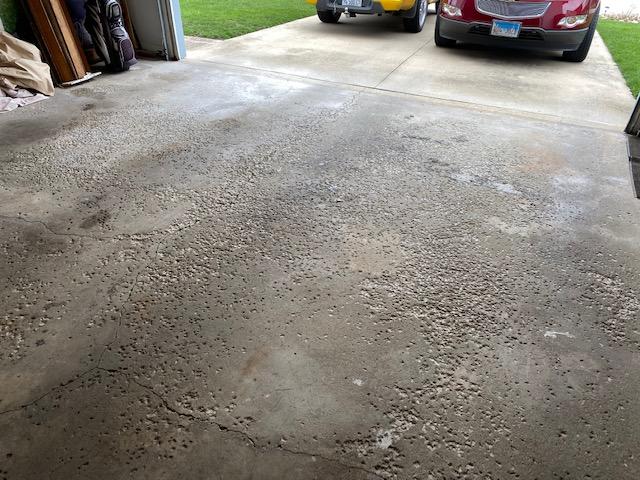
The following is from a customer who had a very badly pitted garage floor. He used Rapid Set Concrete Mix instead of our concrete Crack & Joint Repair Compound because he had to basically patch the entire floor. Our product is easier to work with and is suited for cracks, divots and joints but not really a skim coat product. He also advised not to use the Rapid Set Mortar because it doesn’t set right. Here’s a picture of what his floor looked like originally before he used the Garage Floor Epoxy kit in Pattern #2.

As you can see this floor was a disaster and you’ll be amazed at what it turned into with some elbow grease and the AmroGarage Granite Garage Epoxy Kit. So now comes the part after he has applied the concrete mix and let it cure. When using the Rapid Set Concrete Mix you have to work quickly because it sets up in 10 minutes unlike our patch products that give you 30-40 minutes to work with.

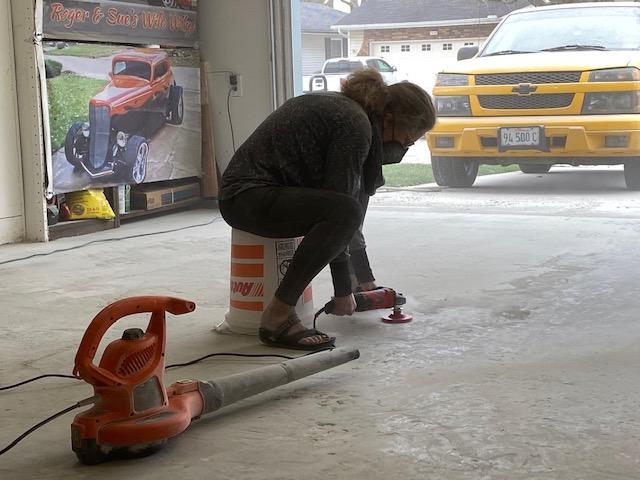
Here he is using a right angle drill with a grinding disk to smooth out the patch. You can rent a diamond grinder to make it faster and easier to smooth out the patching. So for large resurfacing jobs you can use the Rapid Set, it’s a quality product and our follow ups with him have told us that the patching has not cracked or chipped up in any way. For normal patch jobs use our Crack & Joint Compound or our Instant Crack Repair. The Instant Repair lets you paint right over the patch without having to wait for it to cure!

Now comes the good part, this after he applied the Granite Epoxy Flooring kit using our pre selected color combo of Pattern #2.

ArmorGarage Granite Epoxy Pattern #2
The Granite Epoxy kit has a ton of color flakes so it covers any minor blemishes and as you can see the floor came out beautiful, you would never know it was the same floor as the first image above.

He also used our Epoxy flooring primer which we always recommend especially when doing such a large patch job. Then he applied our high build military grade epoxy with 20lbs of color flakes using the supplied spike soles. Then he chose the Military Grade Clear Topcoat instead of the standard heavy duty topcoat. This allowed him to do only one coat instead of three coats. He also used the supplied nonslip additive in the topcoat.

The military grade topcoat is a chemically hardened version of the standard topcoat. It has an abrasion loss rating of only 4 mgs(the lower the number the better) which is the best in the industry. Most other brands provide you with fake topcoats that have ratings of 25-50mgs or higher. They offer little to no protection and no guarantee against wear whereas ArmorGarage provides the only 5 year wear guarantee. No one else provides a guarantee against wear and make no mistake if you don’t have the right topcoat your tire abrasion will wear out your epoxy coating very quickly. Wear won’t be covered under any warranty despite what you may be led to believe.


Shotblasting VS Diamond Grinding

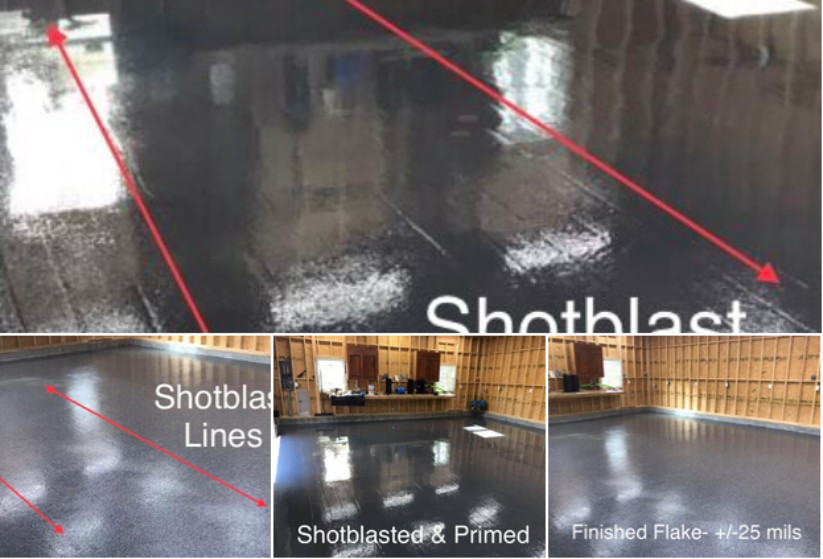
We get asked a lot of times by customers whether they should shotblast or grind their floor. In this post we will discuss the Pros and Cons of each. First lets start with the fact that shotblasting a floor is cheaper than grinding at the outset. The problem with shotblasting is that unless using an aggregate such as sand or doing a heavy flake job you will see what we call lawn mower lines in the finished epoxy. The reason being is that where you overlap with the shotblaster as you go up and down the floor it leaves a line of deeper indents from the shotblasting beads. Then as you apply epoxy those deeper indents hold more pigment and thus show up as lines as you can see in this photo below.

The benefits of shotblasting other than the lower cost is that it gets down into the small nooks and crannies of very dirty floors that are in poor condition. We would recommend grinding after shotblasting to remove as much of the shotblasting lines as possible but when you do this it obviously increases the cost dramatically.

So grinding 95% of the time is the way to go and most times on smaller floors you can rent the floor prep machine from Home Depot which will do the job just fine. For larger floors or extremely dirty floors you will need a larger machine from a tool rental place. When renting a grinder get the biggest grinder you can handle it will make the job easier and faster also whenever possible get the Vac attachment, that goes for the Home Depot machine too. Grinding generates a lot of dust. After grinding make sure to remove all the dust. If time is not an issue you can hose or power wash the floor and while the floor is wet you might as wet scrub some etch in. This will accomplish two things, one it will open up the concrete pores more and second it will clean any low spots the grinding wheel could not reach.

Once the floor is prepped we like to hit it with a good leaf blower just before apply the coating to get the last bits of dust off the floor, you’ll be surprised at how much dust is left. So in conclusion figure to grind rather than shotblast in all but extreme floor situations. Use the floor prep machine from Home Depot on small to medium floors and for larger floors use an industrial size grinder preferably one with at least 3 heads and new diamonds in about the 25-30 grit range. Always try to use a Vac attachment with your grinder, shop vacs won’t work, they clog up in two minutes. Grinding Vacs have pulsating filters to keep them clean as you vac up all the dust. And as always if you have any questions on the condition or preparation of your floor just give us a call or shoot us an email.


ArmorGarage Is Here To Help

Recently we received a call from a large manufacturer that makes a type of caustic polymer that is poured into large vats at 500 degrees. They needed a coating to protect the vats from corrosion and to prevent the polymers from sticking to the concrete. We have many epoxy coatings for a wide variety of applications but nothing that could stand up to a continuous 500 degrees. So we did some research and discovered a company that makes an industrial grade ceramic epoxy coating. There were many other ceramic coatings but they were all residential grade and mostly for use as an upgrade to car wax or other very light duty needs but this one product was geared towards industrial applications. So we called this customer back with the bad news that we couldn’t provide a product to fit their needs but good news that we found a company that most likely could. They were very appreciative and promised that we would get the call for their upcoming flooring projects.

One of the most important keys to a successful coating application is to make sure you choose the right product for your specific application. That’s why we offer so many different types of epoxy coating products, in fact we have a section called Specialty Coatings. There is no one type epoxy fits all product or at least there shouldn’t be. Take a look around our website and be sure to checkout the Specialty Coating section. We also have what we think is the most informative website with regards to epoxy coating product information and how to choose and apply on correctly so you only have to do it once, so take a look at the Need To Know section. If for some reason you don’t think any of our products fit your needs give us a call or shoot us an email it may just be that your application is not listed for a particular product since there are 100s of different uses we can’t list them all. We can double check to see if one of our products will work for you or steer you in the right direction to find a product that will work for you.


TOPCOAT APPLICATION

When applying a topcoat first make sure the epoxy is cured. If you apply the topcoat before the epoxy is completely dry it will end up looking like the image below. Very easy to avoid this, just be patient and let the epoxy dry.

To test if the epoxy is fully dried or not simply press your finger into the epoxy, it should not leave a fingerprint. Next press your fingernail into the epoxy it should be difficult to leave any sort of an imprint. If the epoxy is not completely dry you need to give it more time and or more heat. In the cooler weather overnight temperatures that go below 55 degrees can slow the curing process down. So if your epoxy is a little tacky and the temperature dropped overnight add some heat to the floor and give it more time. This usually solves the issue. Normally we don’t want you going more than 20 hours between epoxy and topcoat but in this instance its ok cause the epoxy has not fully cured yet.

Always use a a roller pan when applying your topcoat this will ensure you don’t get any dull spots from too much nonslip in the spot you poured the topcoat out. Keep the topcoat stirred to keep the nonslip suspended. Another method for the nonslip additive is to broadcast it onto the epoxy and then roll the topcoat over it. When doing this again you want to avoid heavy blotches of the nonslip that can dull the finish of the topcoat. In the picture above you can see the topcoat was applied perfectly as the good areas have an even high gloss. It was just applied too soon. If you do happen to get a small dull spot, it’s easy to fix just lightly sand the topcoat with 100 grit, wipe off the dust and brush on some more topcoat. Don’t worry about scratching the epoxy, the topcoat makes all the scratches disappear.

Typically an epoxy needs 8-10 hours at 75 degrees, as the temperature drops it takes longer to cure. Your topcoat should cure in about 5-6 hours where you cna walk on it and put your stuff back on the floor. However, even though the topcoat is dry to the touch does not mean it is fully cured/hardened. That can take another 48hrs so no heavy traffic till then.

So in cooler weather make sure the floor stays warm overnight while the epoxy is drying and not just during the day. A good trick is to heat the space for a few days prior to doing your job this way the concrete can absorb as much heat as possible and will stay warmer than the ambient air while you apply your epoxy.

And as always if you ever have any questions or concerns before during or after your project just give us a call or shoot us an email and one of our support team members will be happy to help you.


An Amazing Garage Transformation With Armor Granite Epoxy Coating

Below you will see a typical unfinished garage that was transformed by first time users Dan & Debbie H with our Armor Granite Garage Epoxy Flooring kit. They used a standard Pattern 3 that has a medium gray epoxy as the base coat but they changed the color flakes to a custom combination of black, white, charcoal and latte with the military topcoat upgrade. As you can see from the images the change to their garage was dramatic and the floor looks like an actual granite slab. They had no prior experience but yet were able to get this better than professional finish by using our DIY complete epoxy flooring kit. The process is very straight forward and easy to do, the hardest part actually is cleaning out your garage! If you want to transform your garage give us a call we have several different types of epoxy floor coating packages with and without color flakes that can meet any application from just parking your cars to full blown workshops.


When Is An Epoxy Failure Not the Epoxy’s Fault?

PERFECT EXAMPLE OF POOR QUALITY CONCRETE

Take a look at this image and you’ll see that the epoxy has delaminated from the floor in an upward motion. Notice the underside of the piece of epoxy the person is holding and you’ll see the top layer of the concrete slab stuck to the underside of it, notice the granularity of the concrete. The culprit here is the concrete letting loose! This is one of the best examples of sandy or granular concrete we have seen. Usually caused by the contractor using too much aggregate/sand to save some money. The other issue here maybe that there was moisture in the floor and that the moisture pushing up on the epoxy had enough pressure to cause the weak concrete to let loose.

Here’s another example of why you can experience peeling of your epoxy. Although this is not common some floors were poured with a high content of river stone/pebbles also known as pea gravel floor, again most likely due to the contractor trying to save money on the job. See all those black spots they are pea gravel/pebbles that are very smooth and are not porous whatsoever which means its very difficult to get anything to stick to it. If you have this type of concrete you must use the Bonding Primer to ensure adhesion to these types of concrete floors. The above floor where they used too much sand is different as the surface is more granular and loose. This floor is hard and very smooth almost like a polished floor so you need the Bonding Primer as opposed to the sandy floor you need our Standard Primer or better yet our High Solids Primer. Our High Solids Primer is amazing and better than most actual epoxies on the market.

So how do we try to prevent this from happening ? First thing is to always make sure your concrete is 100% dry after etching. We recommend a minimum of 24 hrs to 48 hrs depending on temperature and humidity. If the humidity is very high when you’re floor is drying it will take longer for that moisture to evaporate out of the slab. Secondly take a good look at your floor and if you notice that there is a lot of exposed aggregate or it has sandy type of texture to it use a primer. Our Epoxy Flooring Primer will penetrate into the slab, getting in between the tiny spaces in the aggregate binding them together which greatly strengthens your slab. Also sometimes contractors use pea gravel which are small round stones that are very smooth. This is also a good candidate for the top layer of the concrete letting loose. If you have a pea gravel floor use our Bonding Primer that will bond to the smooth surfaces of the pea gravel thus ensuring a solid bond between your floor and the epoxy.

The good thing is that these types of situations are rare, so chances are you don’t have to worry about this but if you have any doubts just send us a picture and will let you if there’s anything to be concerned about and guide you accordingly. We’ll make sure you use the necessary products so that you don’t have any issues.


How To Do An Epoxy Floor In Sections

In many cases your floor cannot be epoxied all in one shot due to too much stuff to move out or the floor had some repair areas done for lets say for new plumbing. In the case of where you have an existing floor where you cut out some concrete to repair or to install new plumbing. You now have to wait 28 days for the new concrete over the new plumbing to cure but you need the rest of the floor before then. Here’s how you do the floor in sections so you don’t end up with a seam.

Tape off where you need to end the first section then apply the first layer of coating whether it’s a primer or an epoxy. Then apply the next layer and keep back about 12″ from edge of first layer. If you’re using our Ultra Military System you’ll have a third coat to do. So you would apply that and stay back 12″ from second layer. Now you have a stepped layer effect.

Next lightly sand with 100 grit a 12″ strip of each layer that will be overlapped when you do the next section. The reason for this is that after 24 hours our epoxies start to seal up and then it becomes like trying to paint over glass. So always rough up an epoxy that you’re overlapping after 24 hours. This insures a proper bond from the first section with the subsequent sections.

Now in the case with the new concrete areas we would recommend you start your tape line 12″ back from the new concrete. Everything else is the same as above. Just be sure to acid etch the new concrete after 28 days before applying any of our epoxy flooring systems.

And of course if you have any questions please feel free to contact us at info@armorgarage.com or 866-532-3979.